Sunday, December 27, 2009

Family Trees

There was one gift that I made this year that I was the most excited to give.  Our last Christmas party was last night and the last of these gifts was given so I feel safe in posting about it without ruining the surprise for anyone now.

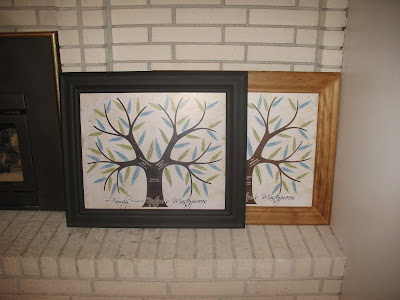
I was SO very glad when Sutton Grace shared how she made some beautiful Family Trees.  It would make the perfect Christmas present for my parents, who are incredibly difficult to shop for.  I knew I'd love one as well as my brother, my sister, my father-in-law, my mother-in-law, and my good friend.  Here's her family trees - such beautiful pieces of art!


Sutton Grace provided templates to make these beautiful family trees out of scrapbook paper.  I was not looking forward to cutting out hundreds of leaves but knew the effort would be well worth it.  Imagine how silly I felt when after looking as scrapbook papers I thought "I wish I could just do this digitally, I have so many cute papers that would be perfect for this"  DUH!!!  I CAN and I did.  Once I got the template made for each tree it was fairly simple to just insert the right names.  I say fairly because apparently there is a lot of geneology to be done for both my family and my husband's so I spent a lot of time trying to find missing names.

Here's what each tree looked like before I got all the names entered in.  I was so excited to get them printed I think I skipped into Costco to pick them up!


I thought the hard part was done, boy was I wrong!  We had the hardest time finding frames that were the right size for this project, 20x24.  I found one frame in all the local craft & home decor stores in my area.  It wasn't cheep and it wasn't what I pictured so... we made our own.  I'm so grateful for my husband and his willingness to help with all my crazy projects.  James figured out how to make the frames sturdy and beautiful!  He used crown molding, table saws, drills, and several other items.  I would attempt to explain in more detail how he accomplished this but I'm afraid it would be lacking.  So I'll just say "He's my hero" and leave it at that  :-)

We've made five frames so far.  Mine is still undone since the one's that were Christmas gifts took precedence.  We also used a purchased frame for one because it needed a lot of names filled in still.  I mounted each poster with mod podge and sealed it with a layer of mod podge applied with a texturized brush.  So, no need for glass!


(I really need to figure out how to get my daughter's drink dribbles off of brick!!!  YUCK!)


We have a few more to make.  My grandparents, my husband's grandparents and other family members have asked for some.  We're going to be busy little bees with all these pictures for a while.

Tuesday, December 22, 2009

Tutus, Tutus Everywhere

This year I vowed to make most of the Christmas presents for my friends and family. It was a learning experience to say the least! I learned that handmaking gifts and heading up the children’s activity for our Ward Christmas party are not conducive to a relaxing Christmas season. Lesson learned, next year I WILL have most of my handmade gifts done by Thanksgiving so I can focus on the fun stuff and the true meaning of Christmas with my family instead of frantically trying to get ready for whatever event or party is happening this weekend.


By far the easiest project was the tutus. Our ward put on a talent show and I thought it would be cute to have the little girls in the ward perform an impromptu ballet. I made a dozen tutus for this performance as well as one for my daughter, my niece, and my best-friends 2 kids.

This project is SO simple! I loved it. I think all the girls in my life are getting tutus from now on! Yes ladies you too :-)

I bought the tulle from the local party store in the wedding section. It’s already cut in 6” strips so I just had to cut it to the lengths I needed. At first I used a yard stick and folded the fabric back and forth, back and forth, back and forth. By the time I was cutting each and every fold I decided I had to find an easier way to do it. Inspiration hit and I found a box that was the right size – I wrapped the tulle around it and made one cut across. Easy – Peasy! I cut the tulle to 25 inches which makes a tutu that is 12 inches long. You could easily change this length for longer or shorter tutus based on your likes & needs.

I used different items for the waistbands with varying results. I’ll get into the different options later. First I want to talk about the knots because they were all the same. I got comfy on the couch, started up a movie and put the elastic or ribbon around my thigh. I then folded a piece of tulle in half and slipped the loop under the elastic. I tucked the remaining tulle over the elastic/ribbon and through the loop creating a knot that kind-of looks like a tie. I continued around the length until the entire waistband was covered in tulle ties.

I used several different items for the waist band, in fact each set of tutu’s I made were made using different items. The first one I made was for my daughter. I used 1.5” elastic sewn to her waist size. I liked the look of this tutu recognized that I will need to either tighten the knots on a regular basis or change them to double knots because they loosen fairly easily. I used 1 roll of 6” tulle, or 25 yards for this tutu.


Next I completed the TWELVE tutus for the ward party. This is a testament to how easy the tutus were to make. It took about 6 hours total to make all 12. It probably would’ve gone faster but I was watching movies and was easily distracted during some scenes. I didn’t want the expense of elastic or ribbon waistbands so I used soft nylon rope – yup, the cheep stuff. This also allowed the tutus to be more adjustable for all the different girls. I used one roll of 6” tulle for each tutu.  I didn’t get a picture of all the tutu’s and I’m crushed about it. I was busy backstage encouraging the girls to twirl and jump instead of out front taking pictures. I’m still looking for someone that got a snapshot of all the cuties dancing but so far no luck.

The third type of tutu I used was for my niece’s 2nd birthday present. I used elastic again but went with a smaller size (1/4”). I was able to tie tighter knots and used nearly 2 rolls for her tutu. Once again, bad blogger, I didn’t take a picture. My niece was rather frightened of the tutu at first so I couldn’t get any pics of her wearing it. I've been assured that by the following morning she was all about wearing her yellow tutu all around the house so it must not have been too scary for her.  I’ll have to ask my sister for a picture or two and update this later.

The last set of tutu’s I made turned out to be my favorite! I decided to go with ribbon. This provided the tightest, most uniform knots. The downside to using ribbon is Mom is going to have to tie them on her little ones instead of the ease of elastic. I used 1 ½ rolls of tulle for each tutu and alternated the colors. Too Cute!


Why this picture is loading sideways is beyond me!  I can't get it to rotate.... argh!


I had a  lot of fun making all of these tutus and am excited to make more in the future.  They are a cheap and wonderful gift for any little girl.  They'd also work great for different Halloween costumes. 

I think tulle is a new favorite crafting item - lots of fun ideas to explore.  I'm thinking next year's Christmas tree is going to have tulle garland... I must make a note to myself to remember.


Wednesday, November 4, 2009

Digital Scrapbooking - Fun Fonts

In my opinion, fonts can make the difference between a cute page and a spectacularly adorable page.  Font's go a long ways in helping to set the mood of a page.

My favorite place to get new fonts is Dafont
They have a text box where you can type in whatever you want and it will change all of their fonts to your phrase so you can see exactly what it looks like before downloading.
After downloading the font you want just unzip the file and right click on the file and click Install.  That's it!

I tried several different fonts with this page and ended up loving this font the most.  It is called Cheri and is available from Dafont here.  I absolutely love the playful nature of this font and am going to have a hard time resisting using it on too many pages! 


I love it when the title of the page stands out.  You know exactly what this page is about by looking at the pictures and the title. 
The title on this page is done with Goudy Stout which I believe is already loaded on most computers.
Journalling needs to be easy to read so elaborate fonts usually won't work.  On this page I used Gill Sans Ultrabold Condensed and it's about as fancy as I get for journalling.


Combining fonts can be a great way to add some interest to your page.  I used a big blocky font for "Lunch" and complimented it with a more elegant font for the other words, "Making" and "Myself." 
I'd love to share which font I used on this page but my External Hard Drive is throwing a tantrum and won't pull up the file so I can look it up.


Font's can also add a fun twist to your page.  In this page I made the text part of the picture.  I'd really like to take credit for this idea but I saw it in a magazine years ago and just had to make my own.  This is so much easier to do than it looks. 


MAKE IT YOURSELF:
- In CS2 add the picture you want to have as the background. 

- On top of this layer add the text, keep it within the size of the picture but try to fill it up as much as possible.  You'll need to play with the size and spacing of the font. 

- Now go back to your origional picture and use the Magnetic Lasso to select around the image you want in front of the text.  You could also use an eraser tool to erase everything you don't want but this would take longer. 

- Now place your cutout on your page on top of your text.  Make sure your placement and sizing are corrent and there you have it. 

A fun effect that just took a few extra steps.


Have fun playing with fonts - they can really embelish your pictures and scrapbook pages.

Thursday, October 15, 2009

I WANT This Dining Room!

I'm officially jealous!


I found a new blog to follow a couple of days ago and am in awe of her dining room.  You can check her blog out HERE

I don't think I'd ever leave her dining room if she invited me over for a visit.  Not only is my fav color on the wall but the window treatments are divine!  I've been searching for a room to paint this color for a little while now.  I love the way the teal in her room looks paired with the dark furniture and neutral drapes.  Gives me great ideas for our Kitchen & Dining Room remodel coming up (soon hopefully!).

Not the usual post for me but I had a big silly grin on my face when I saw the above picture so I thought I'd share it.

Thursday, October 8, 2009

More Halloween Fun!

I added a few finishing touches to my front room shelves today.

I'm so excited with how it turned out!

LOVE the shelves but I'm not sure what I think about the crooked picture!  Might have to change it...

The frame below was super easy.  Just an empty frame, spiderweb and little spiders.  The wire behind the frame doesn't show up in person (much) so I didn't remove it.  Apparently the flash on my camera catches it just right to make it show.


Earlier this week I had the family help me make some ghosts.  Even my husband made one - yup, I got him to craft with me.  He made this little cutie with the bow.  I made the bow for him, didn't want him to feel too overwhelmed with his first craft project.  We took the easy route for the ghosts and used spray starch.  It was a quick, no mess way to make some fun Halloween decorations.


This is the ghost I made.  The thing on his chest is supposed to be a tie... no???
The spider is actually a toy I stole from my son's toybox.  It's one of those jumping spiders minus the little tube.


Here's the ghost my 10 year-old made.  He wanted fangs so fangs he made.  He's also holding a sword but you can't really see it in this angle because of the frame.  I love that he didn't want just a plain ghost.

The 'Wicked' deco is really a warning.  The woman in the picture can be quite a beasty... shhh... don't tell her I said that.

This is all I'll probably do in the house.  I don't have many places that are out of reach of the children - they are true monkeys and have already tried to get to the pumpkins on the shelves.

Up next some fun stuff in the windows and a group of ghosts for the front yard (I'm really excited about this one!)

Sunday, October 4, 2009

Bat Chandelier

Halloween is one of my favorite holidays. Since buying my home a few years back it seems we are working on a major project every year right around Halloween so I don’t spend time or money decorating. This year I decided it was time to change that. My first project was inspired by a decoration I found at pottery barn kids here. It’s cute but not $60 cute (now on sale for $45 but still not that cute)

Here’s my interpretation
SO DANG CUTE!
What you'll need:
3 cross-stitch hoops (I used a 12", 9" and 6")
Stringy Yarn
Craft Foam
Black Electrical Tape
Black Paint
Bat Shape - I used the one above.

Step 1: Paint the inside portion of the cross-stitch hoops black. You can use spray paint or any other craft paint. I used craft paint because it's what I had on hand.

Step 2: Cut your yarn. I cut mine 28" long and used 9 pieces for the chandelier and another 2 for the top. So a total of 11 lengths of yarn.

Step 3: Tie the yarn to the biggest hoop first spacing them as evenly as possible.

Step 4: This one was the trickiest step for me. I ended up using 2 Prego jars to hold the 9" hoop up while I tied them the string to it. Be sure to tie the knots loosely, we'll tighten them up later.

Step 5: Flip your chandelier right side up again and tie the top 2 strings in an X across the top - this is how you will hang your chandelier.

Step 6: Hang the chandelier (with only the two tiers done) and try to get it balanced. Once it's as level as you'd like tighten the knots. I actually spent a long time trying to get the hoops even but never really accomplished the goal. I figured it's for Halloween and a little crooked would only add to the effect - so mine's uneven on purpose /wink/wink/.

Step 7: Leave the chandelier hanging and attach the third tier. Another tricky step. Make sure everything is balanced and tighten the knots. You can also place a dab of craft glue on the inside where each string is attached to each hoop to add extra strength.

It's getting close - this is when I started getting excited.

Step 8: Trace your bat shapes onto craft foam and cut them out. I used 16 bats for mine.

Step 9: Attach the bats with pieces of black electrical tape.

Step 10: Husband asks why I hung the chandelier on the hook and suggests putting it over the light. GREAT IDEA!


Gives the entry way a nice creepy vibe!


Wednesday, September 16, 2009

Antiqued Cabinet

Let me lay the scene for you...

Christmas 2008 we went with a furniture theme for the kids. No fun for them, I know, but they all needed something for their rooms and it was LOTs of fun for Mom!

Our baby's piece of furniture was the first (and last) piece of furniture I've bought online. It was through a company I've done business with before so I trusted them and their pictures/descriptions. I ordered an antiqued cream linen closet for her room. The night before Christmas we were setting up the kids furniture and learned that her linen closet was green! Here is my beautiful antiqued crib next to this ugly green cabinet.
U. G. L. Y.


After the holidays I called to see what we could do to resolve the issue. The company wouldn't take it back without me spending money on shipping and to make matters even better they wouldn't refund any of the original shipping costs either. I took pictures of the color and other problems with the cabinet (yes there are other issues!) and sent them in. I got NO response. I wrote a review expressing my opinion of the product and they didn't post it on the website.


Just a little frustrating.


I decided to keep the cabinet and just fix it. It took me a while to get to the project because I was so upset but I finally started...


Jump and clap with me! I'm in LOVE with this cabinet now.

(please ignore the mess in the garage - it's one of those chores I rarely have time to do)

Here's how I got this beauty...
Anytime you're painting a finished piece of furniture you HAVE to lightly sand it and use primer.
Ask me how I know this... yup skipped this step once before and the paint peeled right off!

After a coat of cream spray paint I considered stopping there. The bed is antiqued and I really wanted it to match but I was scared to mess it up!

I gathered my courage and decided to antique it - like I planned. I used Thompson's WaterSeal Gel Stain in Sierra Brown. It was scary... really, really scary to cover up the cream with the brown stain. Working in small areas I applied the stain then rubbed it off all the areas I didn't want it on. I found I also had to use a wet cloth to get it to look like I wanted it to.

I spray painted the knobs a dark brown, covered a piece of cardboard in fabric to match the room and there it is!

Ahhhh Much better! Now I'll smile instead of cringe everytime I walk in the room! Sigh

Now to dress her up with all sorts of cuteness for my daughter... can't wait!

Wednesday, September 9, 2009

Gone Thrifting...

I've been inspired by all the great crafters that share their thrifting treasures online. Frankly, I've even been a little jealous of some of the awesome finds.


Saturday I went to the local thrift store and learned a few things...


1st - I should never, ever, ever, EVER go on a Saturday again!
It's kind-of a hectic store and throw in a whole gaggle of shoppers and it is quite overwhelming.


2nd - I need a list.
Between the chaos, the shoppers, and all the merchandise I couldn't concentrate on what I was looking for.


3rd - I can not look in other people's carts.
Apparently I have a green-eyed monster living in me. I got there 2 minutes too late to get this adorable treasure chest and was so frustrated I missed the opportunity that I felt like I was in a race to find the next treasure.


Overall, a very eventful trip - despite not buying a thing.


I made a list of items I'm looking for and ideas I have for projects and braved the great thrift store again today. I was VERY excited with my finds and can't wait to share the projects with you when I complete them.


Here's what I got...


Hutch - $7
Glass Bow Container - $2
TV Tray - $8


$17 and I came out skipping and clapping! That's the cheapest entertainment I've had for a long time and the fun hasn't even started yet.


Here's a sneak peak of what I'm working on right now.
It's even on my list of 2009 Goals!

Tuesday, September 1, 2009

There's How Many Months Left?

The year is officially 2/3rds over and I thought I would make a list of the projects I had planned on accomplishing for 2009.

Before I begin let me just say that my list was very achievable at the time I made it – honestly! Then life, self-employment and the poor economy happened. Our construction company had a rough time when every home builder decided to STOP building and many commercial projects were put on hold. Despite the slow-down in work my husband managed to keep very busy but didn’t make the money we would have under normal circumstances. Most years you can often hear me and my husband saying "When we have the money we don't have the time, when we have the time we don't have the money." This year we're singing a different tune: "We ain't got the time OR money!" As a result I've been wary to spend money on decorating. Things are picking up so I'm going to try the amazing feat of accomplishing a year's worth of goals in a four month period.

2009 Goal


Finish ALL Unfinished Projects


We are professional project starters but usually get sidetracked before the job is complete. As a result we have MANY projects that need to some attention.

1. Finish the Backyard – We tore out our yard last year, put in a new rock wall and let the weeds have at it. This year we already installed the sprinkling system, laid the sod, planted new trees, and got our elephant fountain working.
Remaining Projects:
· Finished everything planned for 2009! Now picture me doing the HAPPY DANCE!


2. Finish the Baby’s Room – I feel horrible that her room wasn’t done by the time she was born last May. I feel worse that it’s still not done!
Remaining Projects:
· Paint Cupboard – don’t even get me started on why I need to do this!
· Reconfigure Artwork – it’s just not working for me the way it is
· Finish Drapery
· Refinish My Play Cupboard from when I was little (officially I wasn’t planning on getting this done until next year – but I’m always hopeful)


3. Finish our 10-Year-Old’s Room - His room was done until we had to move him from his completed bedroom to make room for our newest addition last year – should’ve thought that project through a little better.
Remaining Projects:
· Finish Border – I designed the CUTEST boarder for his room but have been waiting for over a year now for my husband to weld up the joints and finish attaching the bottom edge to the wall. I think it’s time to bring out the whip!
· Drapery
· Rope Lighting – I have a fun project planned for some extra lighting in his room.


4. Finish the Front Room – This was the first room I started when we moved into our home 4 years ago. It is constantly being put on the back burner for more immediate needs though.
Remaining Projects:
· Need to buy/find/make (whichever – tables, artwork, lighting Oh MY!


5. Finish Painting the Basement – The kids and I spend a lot of time downstairs. It’s where our playroom, office and craft-room are so TONS of fun to be had!
Remaining Projects:
· Paint the Ceiling – about half way done
· Get Curtain Rods – I’ve had the curtains for about 2 years but just haven’t taken the time to get the rods and hang them up. BAD Shanon!
· Paint Doors & Floor Boards – once again, about half way done
· Paint Walls – sensing a trend… about half way done
· Update Electrical Outlets

Okay, I’m officially FREAKING out! I don’t know if I’ll get everything accomplished – but I know I’m going to give it a go… Keep your eyes open for some posts about these projects as I complete them. Feel free to harass me if you don’t see anything for a while :)


Oh man - this doesn't even include my 2009 Scrapbook that I'm behind on or my goals on getting all the little storage areas and closets organized... We'll just see how much of a SUPER WOMAN I can be in these remaining few months I guess!

Saturday, August 29, 2009

In Need of A Little Sparkle

My 1 year-old daughter refuses to wear ANYTHING on her head. I've tried sun hats, beanies of many kinds, bows, clips, head bands... Nothing ever stays on for longer than a few seconds. The only thing I have found she will gladly keep on her head is her brother's ball-caps - SO NOT GIRLY! Before I went out and purchased yet another hat for her I decided to give one of her brother's a makeover. If she doesn't like it - it's okay, I didn't spend a dime!

I dug up some unused flower buttons from a project for my niece, glittery gem stones left over from our Christmas Ornaments last year and one of my favorite products - Aleene's Tacky Glue (in the gold bottle). It works on and for everything!


I used my knee to keep the shape of the hat while glueing on all the fun and my 3 year-old helped picking which flowers should adorn the hat. Since the hat is for my 1 year-old I made sure to get glue all over the back of each item so there would be less chance of her picking them off. I had to be careful not to put too much stuff on the hat actually - I found myself wanting to add more and more flowers and gems.

Still camo - but now it's camo with SPARKLE!


Monday, August 24, 2009

Finally Got Some Time...

I finally was able to get both my kids down for a nap at the SAME time. A very rare occurance! I decided to spend this golden opportunity addressing a problem I've been meaning to take care of for a long time. Let's see if you can guess what I made...


No idea huh? Let's try another angle...


Ok then, here's a BIG clue...


I made a cord organizer! Well, technically not a cord organizer, but a cord hider I guess :)

I have a wonderful (if rarely used) office. Unfortunately, because my kitchen table is so central to my entire house I tend to spend most of my computer time there. Between my cordless mouse transmitter thingy (no idea what it's called), my external hard drive, my ipod cord and my phone cord I have quite the mess at the table most days.

I needed a way to make my mess appear more organized and make it easier to move the laptop from the table to other parts of the house when needed. What I came up with was a very simple solution. I used:
  • A box with an attached lid
  • 3 coordinating pieces of 12x12 scrapbooking paper
  • Mod Podge

It was as simple as wrapping a present and I think my table looks much cleaner! Yeah me! :)


Friday, August 14, 2009

Digital Scrapbooking - Getting Started

Paper scrapbooking. I tried it, I didn’t like it. There were many reasons but all in all it just wasn’t for me. I was ecstatic to discover Digital Scrapbooking a couple of years ago and have been in love with the whole creative process ever since.

I personally use Adobe Creative Suite 2 and haven’t felt a need to upgrade to 3 or now 4. There are so many programs available ranging from VERY affordable to VERY pricey. Choosing the right software is a personal decision you should base on you budget and computer skills. I highly recommend any of Adobe’s Create Suite software, but then that’s all I’ve used.

Beyond the software, creating a Digital Scrapbook page can cost pennies or even can be FREE. There are tons of websites that offer free kits to download. A lot of times these kits include background papers, embellishments, text, and journaling pieces, special effect brushes etc. I have purchased TWO things for digital scrapbooking and spent a total of $9 on them. Once downloaded, you can use these kits over and over and over. Simply searching the internet for “DIGITAL SCRAPBOOKING FREEBIES” will produce hundreds of sites to look through. Here are some of my favorite shops:
Shabby Princess has offered some of my favorite kits.
Two Peas in a Bucket offers a lot of smaller kits for free. This link takes you to all of their items priced below $2, including their free items
Scrapbooks Etc is a great resource for How-Tos and has several free downloads
Peppermint Creative
Retro Diva
Simply Clean

A note on free downloads: All of the free downloads I have found and downloaded are for personal use only. There is the ability to purchase and download kits that can be used for professional uses. If you want to use any of the downloads to make money or commercially you NEED to get permission from the designers and most likely will need to buy a commercial license to use their products.

There are many more sites and I’m sure I’m forgetting some really good ones. To be honest, I haven’t downloaded any freebies for close to a year now. I have found that I have more than enough cute stuff to complete anything my heart could desire.

Once you have the software and paper/embellishments you want all you need to do is put them together and there you have it – your first scrapbooking page.

I looked through all the pages I’ve done to select my favorite but wasn’t able to narrow it down. Instead, you can see my pages here:
2009
2008
2005 - 2007
If you have any questions about how a certain effect was accomplished feel free to ask and I'll make a "How-To" for you (keep in mind I use Adobe CS2 - instructions will most likely work for CS3 & 4 but I'm not familiar enough with other programs to be able to compare them)

I’ll post more information about Digital Scrapbooking at a later time. I’ve learned lots of fun tricks to making pages one of a kind and can’t wait to share them!

Thursday, August 13, 2009

Kids Rooms Are SO Fun!

When I look at my creative endeavors over the past few years the project that I am the most proud of is my son's bedroom. It was the first room I really took the time to plan out and execute it fully and I couldn't be happier with the result.

The room was inspired by a rocking horse I got from my Grandpa Decker when I was 2 years old. It had been sitting in storage for countless years and needed to be refinished. This project itself was especially hard as my Grandpa passed during my pregnancy with Xander.


Here is what my rocking horse looked like before. It was made by my Grandfather and painted by my Grandmother and Aunt Liz.


I changed him up a bit. I tried to keep the face the same with the exception of the eyelashes.


I dragged my mother around to dozens of fabric stores looking for the perfect materials. I sewed everything in the room myself (except the sheet) without patterns.


Recovered and painted the rocking chair. Also painted the sidetable to match the closet doors.
We replaced the paneled closet doors with jut plain core doors, painted them red and added white trim to make them look like barn doors. :)


Making the border took longer than I had expected - but that was because I didn't think through everything I had planned. We had to hang to wood, staple up the rope, paint the little embelishements by hand (all 30 of them) then glue them on! Whew - talk about a project. The name was fun and once I got the layout of the rope figured out it went really smoothly. Painting the room was a blast. The bottom was done with a denim paint finish and the top was spounged on.


All 3 hats were white - I painted one tan and one brown (it's hard to see the difference in the picture but you can tell in the room) and sewed the had bands with scraps to match the rest of the room.



James was kind enough to make me a window box to match the border. The curtains were super easy to sew and I keep meaning to add some little details to them but they are still the same. This picture is a more recent one and has his toy box and rug that were added later.


Overall I LOVE the way this room turned out. Luckily I finshed everything just a few days before Xander decided it was time to join the family. My only wish is that I can be as happy with all my decorating attempts as I am with this one.