Sunday, December 27, 2009

Family Trees

There was one gift that I made this year that I was the most excited to give.  Our last Christmas party was last night and the last of these gifts was given so I feel safe in posting about it without ruining the surprise for anyone now.

I was SO very glad when Sutton Grace shared how she made some beautiful Family Trees.  It would make the perfect Christmas present for my parents, who are incredibly difficult to shop for.  I knew I'd love one as well as my brother, my sister, my father-in-law, my mother-in-law, and my good friend.  Here's her family trees - such beautiful pieces of art!


Sutton Grace provided templates to make these beautiful family trees out of scrapbook paper.  I was not looking forward to cutting out hundreds of leaves but knew the effort would be well worth it.  Imagine how silly I felt when after looking as scrapbook papers I thought "I wish I could just do this digitally, I have so many cute papers that would be perfect for this"  DUH!!!  I CAN and I did.  Once I got the template made for each tree it was fairly simple to just insert the right names.  I say fairly because apparently there is a lot of geneology to be done for both my family and my husband's so I spent a lot of time trying to find missing names.

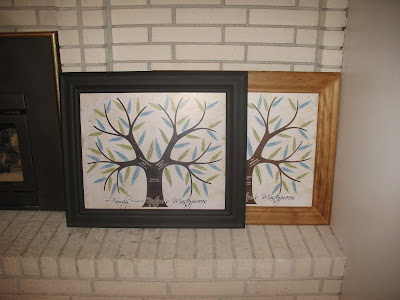
Here's what each tree looked like before I got all the names entered in.  I was so excited to get them printed I think I skipped into Costco to pick them up!


I thought the hard part was done, boy was I wrong!  We had the hardest time finding frames that were the right size for this project, 20x24.  I found one frame in all the local craft & home decor stores in my area.  It wasn't cheep and it wasn't what I pictured so... we made our own.  I'm so grateful for my husband and his willingness to help with all my crazy projects.  James figured out how to make the frames sturdy and beautiful!  He used crown molding, table saws, drills, and several other items.  I would attempt to explain in more detail how he accomplished this but I'm afraid it would be lacking.  So I'll just say "He's my hero" and leave it at that  :-)

We've made five frames so far.  Mine is still undone since the one's that were Christmas gifts took precedence.  We also used a purchased frame for one because it needed a lot of names filled in still.  I mounted each poster with mod podge and sealed it with a layer of mod podge applied with a texturized brush.  So, no need for glass!


(I really need to figure out how to get my daughter's drink dribbles off of brick!!!  YUCK!)


We have a few more to make.  My grandparents, my husband's grandparents and other family members have asked for some.  We're going to be busy little bees with all these pictures for a while.

Tuesday, December 22, 2009

Tutus, Tutus Everywhere

This year I vowed to make most of the Christmas presents for my friends and family. It was a learning experience to say the least! I learned that handmaking gifts and heading up the children’s activity for our Ward Christmas party are not conducive to a relaxing Christmas season. Lesson learned, next year I WILL have most of my handmade gifts done by Thanksgiving so I can focus on the fun stuff and the true meaning of Christmas with my family instead of frantically trying to get ready for whatever event or party is happening this weekend.


By far the easiest project was the tutus. Our ward put on a talent show and I thought it would be cute to have the little girls in the ward perform an impromptu ballet. I made a dozen tutus for this performance as well as one for my daughter, my niece, and my best-friends 2 kids.

This project is SO simple! I loved it. I think all the girls in my life are getting tutus from now on! Yes ladies you too :-)

I bought the tulle from the local party store in the wedding section. It’s already cut in 6” strips so I just had to cut it to the lengths I needed. At first I used a yard stick and folded the fabric back and forth, back and forth, back and forth. By the time I was cutting each and every fold I decided I had to find an easier way to do it. Inspiration hit and I found a box that was the right size – I wrapped the tulle around it and made one cut across. Easy – Peasy! I cut the tulle to 25 inches which makes a tutu that is 12 inches long. You could easily change this length for longer or shorter tutus based on your likes & needs.

I used different items for the waistbands with varying results. I’ll get into the different options later. First I want to talk about the knots because they were all the same. I got comfy on the couch, started up a movie and put the elastic or ribbon around my thigh. I then folded a piece of tulle in half and slipped the loop under the elastic. I tucked the remaining tulle over the elastic/ribbon and through the loop creating a knot that kind-of looks like a tie. I continued around the length until the entire waistband was covered in tulle ties.

I used several different items for the waist band, in fact each set of tutu’s I made were made using different items. The first one I made was for my daughter. I used 1.5” elastic sewn to her waist size. I liked the look of this tutu recognized that I will need to either tighten the knots on a regular basis or change them to double knots because they loosen fairly easily. I used 1 roll of 6” tulle, or 25 yards for this tutu.


Next I completed the TWELVE tutus for the ward party. This is a testament to how easy the tutus were to make. It took about 6 hours total to make all 12. It probably would’ve gone faster but I was watching movies and was easily distracted during some scenes. I didn’t want the expense of elastic or ribbon waistbands so I used soft nylon rope – yup, the cheep stuff. This also allowed the tutus to be more adjustable for all the different girls. I used one roll of 6” tulle for each tutu.  I didn’t get a picture of all the tutu’s and I’m crushed about it. I was busy backstage encouraging the girls to twirl and jump instead of out front taking pictures. I’m still looking for someone that got a snapshot of all the cuties dancing but so far no luck.

The third type of tutu I used was for my niece’s 2nd birthday present. I used elastic again but went with a smaller size (1/4”). I was able to tie tighter knots and used nearly 2 rolls for her tutu. Once again, bad blogger, I didn’t take a picture. My niece was rather frightened of the tutu at first so I couldn’t get any pics of her wearing it. I've been assured that by the following morning she was all about wearing her yellow tutu all around the house so it must not have been too scary for her.  I’ll have to ask my sister for a picture or two and update this later.

The last set of tutu’s I made turned out to be my favorite! I decided to go with ribbon. This provided the tightest, most uniform knots. The downside to using ribbon is Mom is going to have to tie them on her little ones instead of the ease of elastic. I used 1 ½ rolls of tulle for each tutu and alternated the colors. Too Cute!


Why this picture is loading sideways is beyond me!  I can't get it to rotate.... argh!


I had a  lot of fun making all of these tutus and am excited to make more in the future.  They are a cheap and wonderful gift for any little girl.  They'd also work great for different Halloween costumes. 

I think tulle is a new favorite crafting item - lots of fun ideas to explore.  I'm thinking next year's Christmas tree is going to have tulle garland... I must make a note to myself to remember.